Cookie Banner and Cookie Settings
How visitors choose which cookies your site uses, and how to control your own tracking scripts
Overview
The cookie banner tells visitors your site uses cookies and lets them choose which ones. Visitors can allow everything, decline optional cookies, or open the Cookie settings window to turn Analytics and Marketing cookies on or off one at a time. The window stays available after the banner is gone, so visitors can change their mind at any time.
Optional cookies are on until a visitor turns them off. Browsers that send a Global Privacy Control signal have Marketing cookies turned off automatically.
Cookie Categories
| Category | What it covers | Can visitors turn it off? |
|---|---|---|
| Necessary | Cookies the site needs to work, such as security, forms, login and the shopping cart. | No, these are always on. |
| Analytics | Google Analytics, plus any of your scripts set to Analytics. | Yes. |
| Marketing | Google advertising features, plus any of your scripts set to Marketing, such as a Facebook Pixel. | Yes. Also off for browsers that send Global Privacy Control. |
When a visitor turns a category off, the scripts in that category stop loading. If the choice changes what the page loads, the page reloads right away so the change takes effect immediately.
Turning On the Cookie Banner
- Navigate to Settings > Site Configuration.
- Click the Cookie Settings tab.
- Turn on Enable cookie policy notification.
- Edit the banner text in Cookie policy html.
- Click Save.
The banner's buttons need their classes to work: js-cookie-consent-agree on the allow button and
js-cookie-consent-decline on the decline button. A Manage cookies button that opens the cookie settings window is
added next to them automatically when your banner doesn't have one. Any button or link on your site with the class
js-cookie-consent-manage opens the window too.
Installing the Google Analytics or Google Tag Manager plugin turns the banner on for you.
The Cookie Settings Window
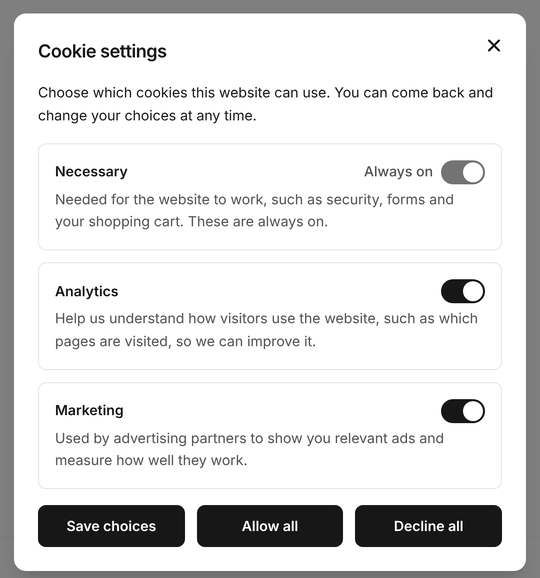
Visitors open the window from the banner's Manage cookies button or from any link to /manage-cookies. Each
optional category has a switch, and the window has three buttons:
- Save choices keeps the switches as the visitor set them.
- Allow all turns every category on.
- Decline all turns every optional category off.
Adding a Cookie Settings Link
Add a link to /manage-cookies in your footer or menu so visitors can reopen the window after the banner is gone. Name
it something visitors recognize, such as Cookie Settings or Your Privacy Choices. See
Menus & Navigation for adding menu links.
The link opens the window on the page the visitor is already on. If someone opens the address directly, they are taken
back to the page they came from, or the home page, with the window open. If your site has its own page or redirect at
/manage-cookies, opening the address directly shows that page or redirect instead, while links to it on your site
still open the window.
Changing the Window Text
The window's text has defaults that suit most sites. To change it:
- Navigate to Settings > Site Configuration.
- Click the Cookie Settings tab.
- Under Cookie settings window, fill in the fields you want to change. Leave a field blank to keep the default text shown in it.
- Click Save.
| Field | Description |
|---|---|
| Title | The heading at the top of the window. |
| Introduction | The sentence under the heading. |
| Necessary cookies description | The explanation under Necessary. |
| Analytics cookies description | The explanation under Analytics. |
| Marketing cookies description | The explanation under Marketing. |
Global Privacy Control
Global Privacy Control is a browser setting that tells websites the visitor doesn't want their data sold or shared for advertising. When a browser sends it, your site turns Marketing cookies off for that visitor, and the cookie settings window shows a note that their opt-out request was honored. Analytics cookies are not affected.
A visitor who still wants Marketing cookies can turn the Marketing switch back on in the window and click Save choices. Clicking Allow cookies in the banner does not override the signal, and neither does a choice the visitor saved before their browser started sending it.
Your site also publishes a standard file at /.well-known/gpc.json that tells browsers and privacy auditors it honors
the signal. It is available while the cookie banner is on.
Controlling Your Own Scripts
New scripts you paste into CMS Max start as Necessary, which loads for every visitor. Set a category on every tracking or advertising script so the banner, the cookie settings window and Global Privacy Control can turn it off.
Existing scripts that load a well-known advertising tag, such as a Facebook Pixel, Simpli.fi, TikTok, LinkedIn Insight, Pinterest, Bing, Google Ads or AdSense tag, are set to Marketing automatically, and so are such scripts brought over from an older CMS Max site. Google Analytics tags you pasted yourself stay Necessary until you change them. Check your scripts and change any category that doesn't fit.
A category applies to the whole script. If one script holds an ad pixel together with code your site needs, such as a menu or a form helper, move the pixel into a script of its own and set only that one to Marketing. Otherwise the site code stops too for visitors who turn Marketing off.
Give a script that sends events to a pixel, such as fbq('track', 'Purchase') or gtag('event', 'conversion', …) on
a thank-you page, the same category as the pixel itself. When the pixel is turned off, the event can't be sent, and code
after the event call in the same script doesn't run.
Site-Wide Scripts
- Navigate to Template > Theme Configuration.
- Click the JavaScript tab.
- Open the script, for example Facebook Pixel.
- Choose a Cookie category:
- Necessary for scripts the site needs to work, such as a chat widget or an accessibility tool.
- Analytics for visitor statistics tools.
- Marketing for ad pixels, retargeting and conversion tags.
- Click Save Changes.
Page and Section Scripts
Scripts added in the Javascript tab of a page, theme section, promo bar or other content you edit have the same Cookie category field. Set it the same way, then save.
Google Tag Manager Tags
Google Tag Manager loads while a visitor has Analytics or Marketing on, and stops loading when both are off. Google's own tags in your container, such as Google Analytics and Google Ads, follow each choice automatically. Other tags in your container, such as a Facebook Pixel added through Google Tag Manager, don't know about the visitor's choice: turn on the container's consent settings and require ad storage consent for those tags. Otherwise they keep running when the visitor turns Marketing off.
Frequently Asked Questions
A tracking pixel still loads after I turn Marketing off. Why?
The script is still set to Necessary, which always loads. Only existing scripts with well-known advertising tags are set to Marketing automatically. Change its Cookie category to Marketing as described in Controlling Your Own Scripts. If the pixel comes from Google Tag Manager, set up consent for that tag in your container.
Do scripts in a Custom Code shortcode or in page content follow the visitor's choice?
No. Only scripts in Theme Configuration's JavaScript tab and in a page's or section's Javascript tab have a Cookie category. Scripts inside a Custom Code shortcode or pasted into page content always load, so put tracking and advertising scripts in a Javascript tab instead.
Does the window list each cookie and how long it lasts?
No. The window lets visitors choose categories. List the cookies your site uses, and how long each one lasts, in your privacy or cookie policy. See Legal Pages.
Does the banner show when the cookie banner setting is off?
No. With Enable cookie policy notification off, there is no banner and no cookie settings window, and every script loads for every visitor.